Macy’s Garage

© 2018-2025 - Macy’s Garage, Ltd.

Blog
WHAT we’re doing, and HOW we’re doing it!
September 30, 2024
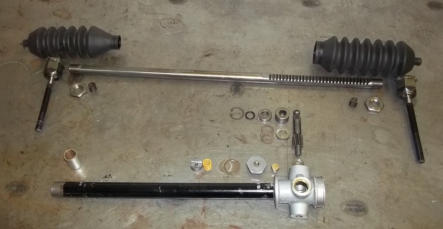
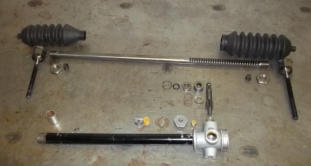
Approximately 15 years ago, we posted a web page showing how to rebuild your own TR2-3B steering box. The intent was to help sidescreen TR owners do this at home, but it mostly prompted folks to send theirs here for us to overhaul! What many guys don’t know is that we also rebuild our own steering racks as used on the TR4-TR6. We’ve even had special tools made to press the bushing out and back into the rack tube on the passenger side, opposite the pinion and the steering rack teeth. You can purchase new steering racks for the “late” TR4 and on through the TR6 from Moss, but the early TR4 version is NA. There’s also a “High Ratio” version available, but keep in mind that the effort to turn the steering wheel will go way up. One more thing to consider is the overall importance and safety implications of the steering system components, so this is one place we prefer to avoid the far-east reproductions.September 23, 2024
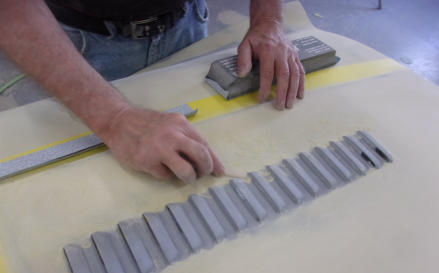
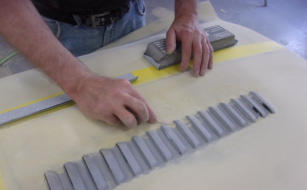
Small changes will often come with BIG price tags. Take this “louvered” hood for example. The owner is going for the vintage “race car” look, and requested this modification while restoring his TR3A. Normally, this will require plenty of time to layout the design and spacing, then careful alignment to that layout as each louver is punched individually with a special set of dies. In this case, we just happened to have a pre-louvered bonnet in our used parts warehouse, so that part of the expense was avoided. But the process of punching each louver involves some stretching of the surrounding metal, so plenty of bodywork is then required to flatten the overall hood. In order to avoid the bonnet looking like it was run-over by a truck, a thin layer of filler was required over just about every square inch and the detail sanding around each louver with a popsicle stick “block” added hours and dollar signs to the process. There’s no limit to the modifications our talented team can make to your TR, but be prepared for the additional costs involved when requesting custom touches.September 16, 2024
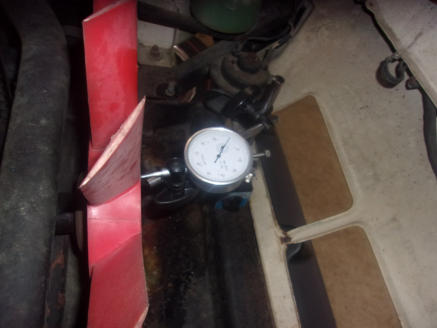
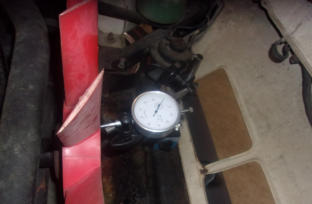
6-cylinder Triumphs have a well known problem with crankshaft thrust washers wearing down and falling out of place, ending up in the bottom of the oil pan. Continued driving with this condition will probably result in a trashed crankshaft, engine block, or both. There is a spec in the workshop manual of .006” - .008”, and this is how you check it. Seeing how this is a problem area, we’ll look visually for excessive movement on every 6-cylinder TR that comes into our shop. If the radiator is out for service (as in this case), we’ll set up the dial indicator for a more precise measurement. If you happen to own a 6 powered TR, you can prolong the life of your thrust washers by NOT holding in the clutch for long periods of time like sitting at a traffic light or “holding” the car with the clutch when stopped on a hill. Instead, pop the shift lever into neutral, let out the clutch, and hold the car still with the brakes until it’s time to go again.September 9, 2024
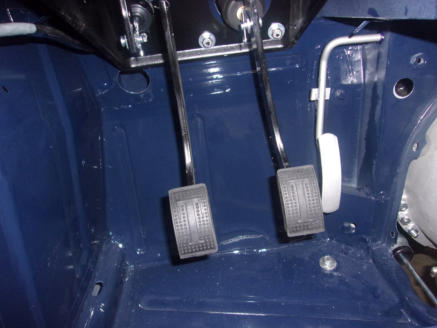
As mentioned with last week’s photo, once the painted body tub is mated to the restored chassis for the final time, each piece that goes back on makes a giant leap forward and it’s exciting to see the visual progress. Just adding a small section such as this restored pedal assembly turns a bare footwell into a thing of beauty. I should also mention that we always install the firewall bushings and gas pedal assembly into the painted body tub BEFORE we set the body into place on the chassis. It is possible to install these components later (with the engine sitting close to the firewall), but it goes a lot faster and easier when the body is still on the car and without the back of the engine restricting access. Just one of those little things we’ve learned from our laser focus on the Triumph TR2-TR6 cars. You learn very quickly from continuous repetition (and previous mistakes!).September 3, 2024
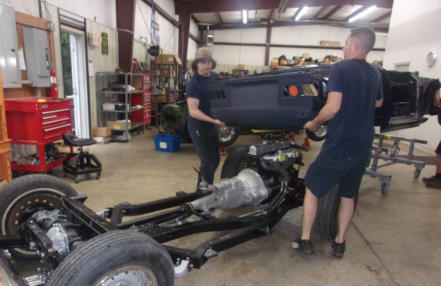
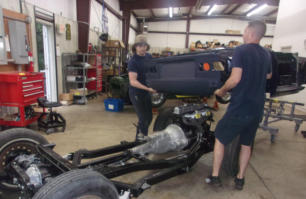
It’s always a time for celebration when a painted body tub goes back onto a fully restored chassis. With little visible progress, the body metal repair and paint preparation processes seemingly take forever. But once the body and chassis come back together for the final time, the big “pile” of parts begin to resemble a Triumph TR once again! Two strong young men can lift a bare body tub, but after it’s been painted and the chassis has been restored to perfection, we’ll use no less than four people to ensure the control needed for precise location and add a larger margin of safety. From this point forward, each part that is added back to the “assembly” is one step closer to a Triumph that can be driven and enjoyed by the happy owner(s) for many years to come.August 26, 2024
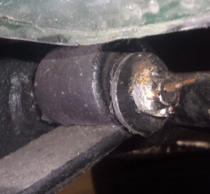
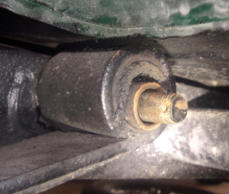
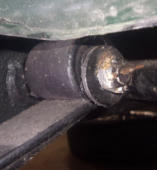
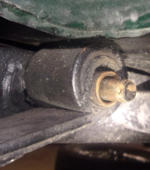
Split shot this week of the front “eye” of a TR3 rear leaf spring. The first picture on the left is “as- found”, with the nut and washer in place. To the untrained eye, everything is fine. But the team here quickly recognized that the washer is not evenly aligned with the spring eye and bushing, so at this point we knew we’d found the source of the rear end “clunk” and the ill handling making the car wanting to change lanes with varying throttle positions. After removing the cotter pin, nut, and flat washer, the damage to the rubber spring bushing is quite evident. Old rubber that has dried out during several decades will turn hard and brittle, develop cracks, and then disintigrate due to pressure applied by the mechanical components it is supposed to support. In cases like this where the bushing is hidden behind other pieces, you have to look at everything with a suspicious mind, and dig in deeper when something doesn’t look right.August 19, 2024
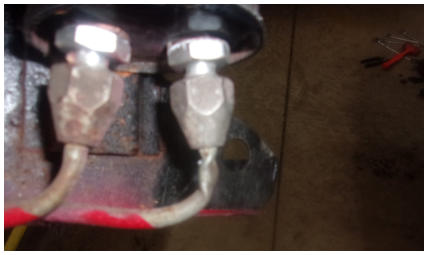
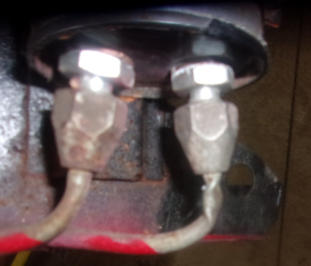
Kinked hydraulic pipes (aka tubes or lines) are a common occurance when disassembling a fitting that has been untouched in several decades. The steel tubes passing through the center of a steel nut (both male and female thread types) will rust together, and the slightest movement of the nut by the force of a wrench will twist the thin walled tube right along with it. Most times the thin tubing will break off completely, but here’s a case where the rust bond apparently broke free, and then someone re-installed the damaged pipe for the next 15-20 years. With this being a non-pressurized supply line bringing fluid from the reservior to the clutch master cylinder they obviously got away with it, although the restricted flow would make bleeding the clutch a slow and painful process. You shouldn’t use a damaged line like this anywhere that it will need to hold pressure, as the restricted volume and possible weakness would certainly pose a safety concern, expecially anywhere in the brake system. To make things easy for the next guy in the distant future, we’ll fabricate our hydraulic pipes with brass fittings, as long as it’s not a concours quality restoration that will be judged. We don’t have to worry about the brass nuts rusting to the steel pipes, and they look kinda cool too!August 12, 2024
It’s not unusual for us to have cars here from all over the USA (and Canada), yet we still hear comments like “I wish you were closer” and “can you recommend someone closer to where I live?”. Without a doubt, comments like those fall on deaf ears, and thankfully there are plenty of Triumph owners who are more concerned with having their cars maintained and restored by the team who know them best than by a local who’ll mess up their TR. The number of cars that have gone somewhere else first and the abuses we then have to correct are mind-boggling! We just completed a full frame-up restoration on this long door TR2 for a happy owner who lives about as far away from us as you can get in the lower 48, well north and west of Seattle, in the farthest NW corner of Washington State. He did his research and figured out that there was only one place to send his pride and joy if he wanted it done correctly and efficiently the first time. His comment upon getting the car home? “Restoration excellence of the entire car”.August 5, 2024
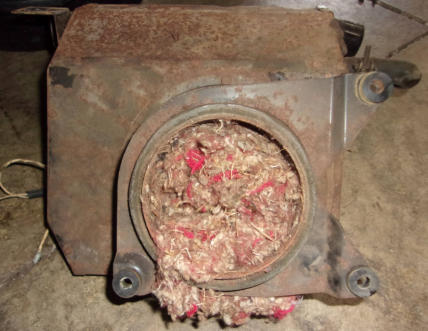
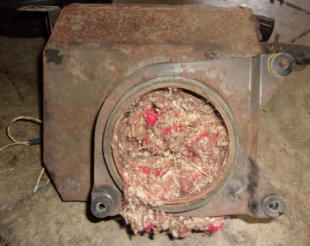
Mice will invade any car, not just those that were stored for years in less than ideal conditions. This heater was removed from a TR4 that is driven every spring-fall, and as late as last October. When they got the car back out this spring, the heater fan had quit working even though it was OK when parked last fall. (This reminds me of the “Ran when Parked” photos of derelict cars in many of the car enthusiast magazines.) This car was carefully stored in the attached garage next to the house, so it’s not like it was neglected for several years in some drafty old barn. We started diagnosing this with the usual fuse, switch, and wire connections, then surmised that the fan motor might have packed it in. It appears that our suspicions were half right, at least about the “packed-in” part! It’s no wonder that the fan wouldn’t (or couldn’t) run! You can see traces of the red carpet here, which is now a little more ragged than it was last fall, but nothing that would make you look at it and wonder what caused a huge new hole. The bottom line is that if you let your collector cars sit for only a few days or a couple of weeks, be suspicious of unwanted guests visiting and causing unseen damage to your pride and joy.July 29, 2024
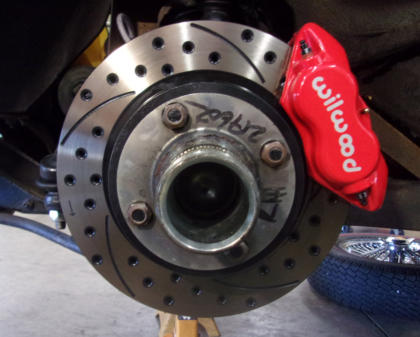
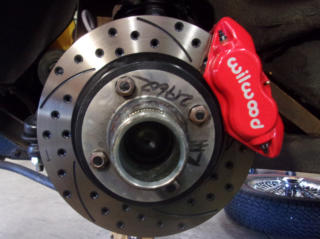
The 1957 Triumph TR3 was the first mass produced car in the world to have front disc brakes fitted as standard equipment. Yes, there were other limited production cars with disc brakes before then, but it was Triumph that brought them to the masses. While the early Girling disc brakes were quite good for the time, a lot has changed since then. Today, that little base model Honda or Toyota ahead of you in traffic has much better brakes than you have on your TR, so you better leave plenty of extra room between your car and theirs! Triumph owners have been searching for “upgrades” to their brakes for years now, with Toyota calipers being one of the most popular modifications. But even the Toyota caliper swap isn’t an easy solution, because you have to round up the right collection of parts to make it all work. This is where the Wilwood conversion kits really shine. Not only do you get nice lightweight 4-piston calipers from a world leader in performance brakes, the bolt-on kits also include H-P rotors and all of the assorted small bits you’ll need. The kits are listed as being “engineered” for the TR6 range, but here you see the kit we installed on Mark’s personal TR250 ‘Test Mule’. They should also work on all TR4 and 4A cars as well. And the most important part is that the car now stops noticeably quicker!July 22, 2024
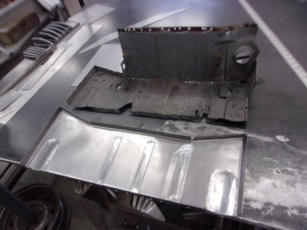
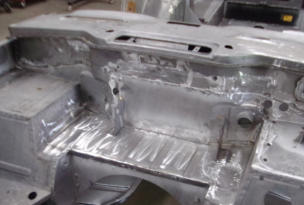
There are many different levels of “repair”, starting with the “just make it work” and going all the way up to “restoration”, where the goal it to make it appear as an “untouched original” with no hint that the repair has never happened. This is an example of the latter. All of the correct stiffening and clearance ribs and folded edges with plug welds to simulate the original spot welds. Tight fitting seams and butt welds where only partial panels were replaced, then solidly TIG welded and the welds ground smooth. A very light coat of body filler will smooth the surface, then prime and paint as if it were an exterior body panel. Yes, that’s a lot of effort to repair a spot that will never be seen, but is a car truly restored if you only pay attention to areas which are easily seen? While the “just make it work” is slightly better than setting the battery on a board or an old license plate (we’ve seen plenty of both), if someone cuts corners here, chances are excellent that they’ll repeat the short-cuts throughout their “restoration”.July 15, 2024
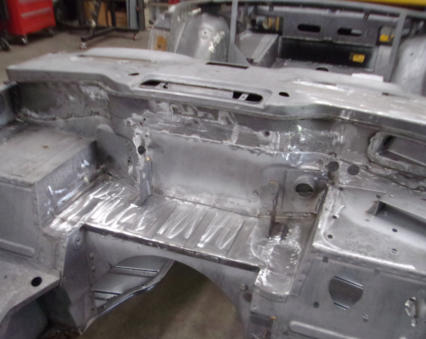
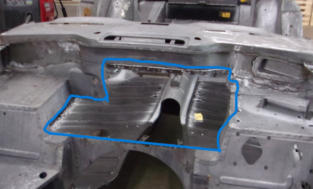
When Triumph tooled up to produce the TR4-TR6, they made complex shapes like the firewall/scuttle out of multiple pieces, and we repair them in exactly the same way. The horizontal bottom “shelf” is the hard part, especially when it extends to the outermost “pockets” necessary for steering column clearance in either LHD or RHD cars. The three long narrow grooves in the center are primarily to add strength to the sheet metal, so that it can hold the weight of a battery. But they also allow moisture to drain out from under the battery, at least when everything is new and shiny. That was a good thought originally, but apparently no one considered that dirt and grime would accumulate in the grooves over years, and that dirt and grime would retain the water/acid mix that ran down from the top of the battery. This quickly disolved the metal and prompted the repairs that are necessary today!July 8, 2024
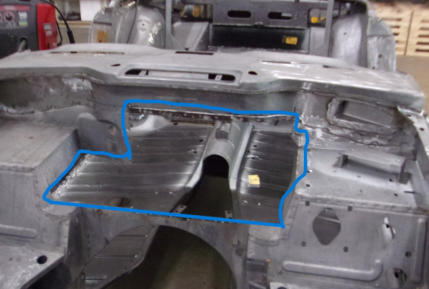
Rusty battery shelfs are a sorry fact of life for ALL vintage car and truck owners, and no less so for fans of the Triumph TR4-TR6. But where many older vehicles have a battery box or tray that is bolted or spot welded in position, allowing easy replacement, Triumph went for the cheaper option and used a flat area of the larger body tub assembly. That complicates the repair process, and especially when the rot spreads to adjoining panels. Here is a TR6 that has already had all of the bad stuff removed, and you can easily see through to the floor pans (new) and driveshaft tunnel. Only recently has a very basic battery tray repair panel become available, but it is expensive for what it is and won’t begin to replace everything that’s usually needed, as seen in this example. Professional fabrication equipment (and skills) will be necessary to bring this back and our metal shop has plenty of both, along with the experience needed to make an invisible repair happen quickly and efficiently.July 1, 2024
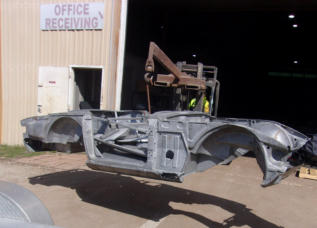
To properly restore a car and repair every spot in need, you must be able to locate all of the bad and weak areas. You can’t fix what you can’t see, so any car that we will be performing paint and bodywork will need to pass through the strip tanks at Pro Strip Indy before we can begin. Thin or perforated metal can’t be counted on to last for the next 30+ years, so it must be replaced with new metal of the correct thickness, and solidly butt-welded to prevent moisture from attacking the paint from the back side. There’s nothing worse than finishing an extensive restoration, only to have the car look like it needs another one just a few short years after completion. Here is a TR6 body tub being loaded onto one of our trailers after a complete stripping at Pro Strip Indy (formerly Redi-Strip). You can see the speaker hole in the side bulkhead panel that will be replaced, but the wide angle photo doesn’t show all the smaller places throughout which will need to be repaired, and there were many spots which were only revealed after the stripping was complete. No stone can remain unturned, and this body tub can now be restored to the same solid condition it was the day it was originally made.
BLOG
2024-Q3
America’s BEST Triumph Shop


Macy’s Garage

© 2018-2025 - Macy’s Garage, Ltd.

Blog
WHAT we’re doing, and HOW we’re doing it!
September 30, 2024
Approximately 15 years ago, we posted a web page showing how to rebuild your own TR2-3B steering box. The intent was to help sidescreen TR owners do this at home, but it mostly prompted folks to send theirs here for us to overhaul! What many guys don’t know is that we also rebuild our own steering racks as used on the TR4-TR6. We’ve even had special tools made to press the bushing out and back into the rack tube on the passenger side, opposite the pinion and the steering rack teeth. You can purchase new steering racks for the “late” TR4 and on through the TR6 from Moss, but the early TR4 version is NA. There’s also a “High Ratio” version available, but keep in mind that the effort to turn the steering wheel will go way up. One more thing to consider is the overall importance and safety implications of the steering system components, so this is one place we prefer to avoid the far-east reproductions.September 23, 2024
Small changes will often come with BIG price tags. Take this “louvered” hood for example. The owner is going for the vintage “race car” look, and requested this modification while restoring his TR3A. Normally, this will require plenty of time to layout the design and spacing, then careful alignment to that layout as each louver is punched individually with a special set of dies. In this case, we just happened to have a pre-louvered bonnet in our used parts warehouse, so that part of the expense was avoided. But the process of punching each louver involves some stretching of the surrounding metal, so plenty of bodywork is then required to flatten the overall hood. In order to avoid the bonnet looking like it was run-over by a truck, a thin layer of filler was required over just about every square inch and the detail sanding around each louver with a popsicle stick “block” added hours and dollar signs to the process. There’s no limit to the modifications our talented team can make to your TR, but be prepared for the additional costs involved when requesting custom touches.September 16, 2024
6-cylinder Triumphs have a well known problem with crankshaft thrust washers wearing down and falling out of place, ending up in the bottom of the oil pan. Continued driving with this condition will probably result in a trashed crankshaft, engine block, or both. There is a spec in the workshop manual of .006” - .008”, and this is how you check it. Seeing how this is a problem area, we’ll look visually for excessive movement on every 6-cylinder TR that comes into our shop. If the radiator is out for service (as in this case), we’ll set up the dial indicator for a more precise measurement. If you happen to own a 6 powered TR, you can prolong the life of your thrust washers by NOT holding in the clutch for long periods of time like sitting at a traffic light or “holding” the car with the clutch when stopped on a hill. Instead, pop the shift lever into neutral, let out the clutch, and hold the car still with the brakes until it’s time to go again.September 9, 2024
As mentioned with last week’s photo, once the painted body tub is mated to the restored chassis for the final time, each piece that goes back on makes a giant leap forward and it’s exciting to see the visual progress. Just adding a small section such as this restored pedal assembly turns a bare footwell into a thing of beauty. I should also mention that we always install the firewall bushings and gas pedal assembly into the painted body tub BEFORE we set the body into place on the chassis. It is possible to install these components later (with the engine sitting close to the firewall), but it goes a lot faster and easier when the body is still on the car and without the back of the engine restricting access. Just one of those little things we’ve learned from our laser focus on the Triumph TR2-TR6 cars. You learn very quickly from continuous repetition (and previous mistakes!).September 3, 2024
It’s always a time for celebration when a painted body tub goes back onto a fully restored chassis. With little visible progress, the body metal repair and paint preparation processes seemingly take forever. But once the body and chassis come back together for the final time, the big “pile” of parts begin to resemble a Triumph TR once again! Two strong young men can lift a bare body tub, but after it’s been painted and the chassis has been restored to perfection, we’ll use no less than four people to ensure the control needed for precise location and add a larger margin of safety. From this point forward, each part that is added back to the “assembly” is one step closer to a Triumph that can be driven and enjoyed by the happy owner(s) for many years to come.August 26, 2024
Split shot this week of the front “eye” of a TR3 rear leaf spring. The first picture on the left is “as-found”, with the nut and washer in place. To the untrained eye, everything is fine. But the team here quickly recognized that the washer is not evenly aligned with the spring eye and bushing, so at this point we knew we’d found the source of the rear end “clunk” and the ill handling making the car wanting to change lanes with varying throttle positions. After removing the cotter pin, nut, and flat washer, the damage to the rubber spring bushing is quite evident. Old rubber that has dried out during several decades will turn hard and brittle, develop cracks, and then disintigrate due to pressure applied by the mechanical components it is supposed to support. In cases like this where the bushing is hidden behind other pieces, you have to look at everything with a suspicious mind, and dig in deeper when something doesn’t look right.August 19, 2024
Kinked hydraulic pipes (aka tubes or lines) are a common occurance when disassembling a fitting that has been untouched in several decades. The steel tubes passing through the center of a steel nut (both male and female thread types) will rust together, and the slightest movement of the nut by the force of a wrench will twist the thin walled tube right along with it. Most times the thin tubing will break off completely, but here’s a case where the rust bond apparently broke free, and then someone re-installed the damaged pipe for the next 15-20 years. With this being a non-pressurized supply line bringing fluid from the reservior to the clutch master cylinder they obviously got away with it, although the restricted flow would make bleeding the clutch a slow and painful process. You shouldn’t use a damaged line like this anywhere that it will need to hold pressure, as the restricted volume and possible weakness would certainly pose a safety concern, expecially anywhere in the brake system. To make things easy for the next guy in the distant future, we’ll fabricate our hydraulic pipes with brass fittings, as long as it’s not a concours quality restoration that will be judged. We don’t have to worry about the brass nuts rusting to the steel pipes, and they look kinda cool too!August 12, 2024
It’s not unusual for us to have cars here from all over the USA (and Canada), yet we still hear comments like “I wish you were closer” and “can you recommend someone closer to where I live?”. Without a doubt, comments like those fall on deaf ears, and thankfully there are plenty of Triumph owners who are more concerned with having their cars maintained and restored by the team who know them best than by a local who’ll mess up their TR. The number of cars that have gone somewhere else first and the abuses we then have to correct are mind-boggling! We just completed a full frame-up restoration on this long door TR2 for a happy owner who lives about as far away from us as you can get in the lower 48, well north and west of Seattle, in the farthest NW corner of Washington State. He did his research and figured out that there was only one place to send his pride and joy if he wanted it done correctly and efficiently the first time. His comment upon getting the car home? “Restoration excellence of the entire car”.August 5, 2024
Mice will invade any car, not just those that were stored for years in less than ideal conditions. This heater was removed from a TR4 that is driven every spring-fall, and as late as last October. When they got the car back out this spring, the heater fan had quit working even though it was OK when parked last fall. (This reminds me of the “Ran when Parked” photos of derelict cars in many of the car enthusiast magazines.) This car was carefully stored in the attached garage next to the house, so it’s not like it was neglected for several years in some drafty old barn. We started diagnosing this with the usual fuse, switch, and wire connections, then surmised that the fan motor might have packed it in. It appears that our suspicions were half right, at least about the “packed-in” part! It’s no wonder that the fan wouldn’t (or couldn’t) run! You can see traces of the red carpet here, which is now a little more ragged than it was last fall, but nothing that would make you look at it and wonder what caused a huge new hole. The bottom line is that if you let your collector cars sit for only a few days or a couple of weeks, be suspicious of unwanted guests visiting and causing unseen damage to your pride and joy.July 29, 2024
The 1957 Triumph TR3 was the first mass produced car in the world to have front disc brakes fitted as standard equipment. Yes, there were other limited production cars with disc brakes before then, but it was Triumph that brought them to the masses. While the early Girling disc brakes were quite good for the time, a lot has changed since then. Today, that little base model Honda or Toyota ahead of you in traffic has much better brakes than you have on your TR, so you better leave plenty of extra room between your car and theirs! Triumph owners have been searching for “upgrades” to their brakes for years now, with Toyota calipers being one of the most popular modifications. But even the Toyota caliper swap isn’t an easy solution, because you have to round up the right collection of parts to make it all work. This is where the Wilwood conversion kits really shine. Not only do you get nice lightweight 4-piston calipers from a world leader in performance brakes, the bolt-on kits also include H-P rotors and all of the assorted small bits you’ll need. The kits are listed as being “engineered” for the TR6 range, but here you see the kit we installed on Mark’s personal TR250 ‘Test Mule’. They should also work on all TR4 and 4A cars as well. And the most important part is that the car now stops noticeably quicker!July 22, 2024
There are many different levels of “repair”, starting with the “just make it work” and going all the way up to “restoration”, where the goal it to make it appear as an “untouched original” with no hint that the repair has never happened. This is an example of the latter. All of the correct stiffening and clearance ribs and folded edges with plug welds to simulate the original spot welds. Tight fitting seams and butt welds where only partial panels were replaced, then solidly TIG welded and the welds ground smooth. A very light coat of body filler will smooth the surface, then prime and paint as if it were an exterior body panel. Yes, that’s a lot of effort to repair a spot that will never be seen, but is a car truly restored if you only pay attention to areas which are easily seen? While the “just make it work” is slightly better than setting the battery on a board or an old license plate (we’ve seen plenty of both), if someone cuts corners here, chances are excellent that they’ll repeat the short- cuts throughout their “restoration”.July 15, 2024
When Triumph tooled up to produce the TR4-TR6, they made complex shapes like the firewall/scuttle out of multiple pieces, and we repair them in exactly the same way. The horizontal bottom “shelf” is the hard part, especially when it extends to the outermost “pockets” necessary for steering column clearance in either LHD or RHD cars. The three long narrow grooves in the center are primarily to add strength to the sheet metal, so that it can hold the weight of a battery. But they also allow moisture to drain out from under the battery, at least when everything is new and shiny. That was a good thought originally, but apparently no one considered that dirt and grime would accumulate in the grooves over years, and that dirt and grime would retain the water/acid mix that ran down from the top of the battery. This quickly disolved the metal and prompted the repairs that are necessary today!July 8, 2024
Rusty battery shelfs are a sorry fact of life for ALL vintage car and truck owners, and no less so for fans of the Triumph TR4-TR6. But where many older vehicles have a battery box or tray that is bolted or spot welded in position, allowing easy replacement, Triumph went for the cheaper option and used a flat area of the larger body tub assembly. That complicates the repair process, and especially when the rot spreads to adjoining panels. Here is a TR6 that has already had all of the bad stuff removed, and you can easily see through to the floor pans (new) and driveshaft tunnel. Only recently has a very basic battery tray repair panel become available, but it is expensive for what it is and won’t begin to replace everything that’s usually needed, as seen in this example. Professional fabrication equipment (and skills) will be necessary to bring this back and our metal shop has plenty of both, along with the experience needed to make an invisible repair happen quickly and efficiently.July 1, 2024
To properly restore a car and repair every spot in need, you must be able to locate all of the bad and weak areas. You can’t fix what you can’t see, so any car that we will be performing paint and bodywork will need to pass through the strip tanks at Pro Strip Indy before we can begin. Thin or perforated metal can’t be counted on to last for the next 30+ years, so it must be replaced with new metal of the correct thickness, and solidly butt-welded to prevent moisture from attacking the paint from the back side. There’s nothing worse than finishing an extensive restoration, only to have the car look like it needs another one just a few short years after completion. Here is a TR6 body tub being loaded onto one of our trailers after a complete stripping at Pro Strip Indy (formerly Redi-Strip). You can see the speaker hole in the side bulkhead panel that will be replaced, but the wide angle photo doesn’t show all the smaller places throughout which will need to be repaired, and there were many spots which were only revealed after the stripping was complete. No stone can remain unturned, and this body tub can now be restored to the same solid condition it was the day it was originally made.

America’s BEST Triumph Shop